Get in Touch with Guanma

A waste skeleton that snaps at the same corner needs a different investigation from one that fails as the rewind roll grows. Save the broken piece before restarting. Position, shape and direction can help the printer more than just another adjustment of the tension.
Die cut label matrix waste breaks can come from weak bridges, release resistance or unstable stripping loads. Check the broken layer, layout, facestock, release test and waste path before making a permanent speed reduction.
Quick checks for a roll-label job
- A stronger face material may still fail at a nick or narrow bridge.
- A low-speed release result isn’t a press-speed stripping limit.
- Compare total time and stock consumed for the same accepted output.
Updated October 2026
Matrix waste in die cutting: identify the broken layer
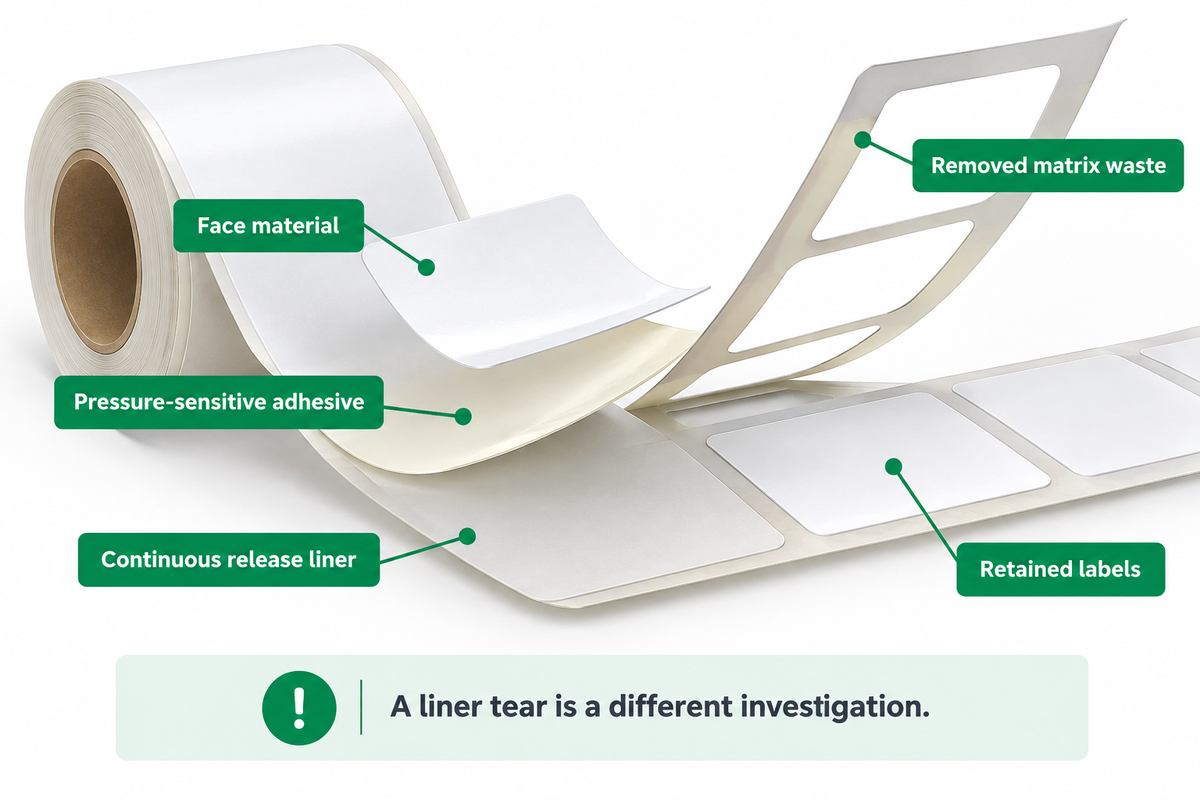
Matrix waste is the face material and pressure-sensitive adhesive removed from around the retained labels. The bottom release liner continues through the machine with the labels attached. If that liner tears across the web, then matrix waste removal troubleshooting is out of scope.
What does die cut mean for labels?
Die cutting uses shaped tooling to cut the label outline. A circle or a rectangle can be die-cut just like a complex outline. In this case of a roll-label process, the cut separates the face material and adhesive, while the backing remains continuous. The adjacent waste is removed. Loose die-cut stickers may also have their backing cut around the finished shape, so confirm the product format.
Separate the loose skeleton from the backing and inspect both. If the die blade leaves an incomplete cut, resolve that separation before testing stronger stock. A fracture through the narrow waste section indicates geometrical or material problems or excess stripping load. An intact skeleton carrying finished labels suggests a separation problem. Look for adhesive strings or buildup; use the guide to adhesive ooze in label rolls when dealing with tacky deposits.
Avery Dennison’s matrix-stripping patent description distinguishes the face layer, adhesive and liner. This construction also shows why a clean-looking graphic says little about the strength of a waste skeleton.
Narrow bridges, label shape and the weakest section
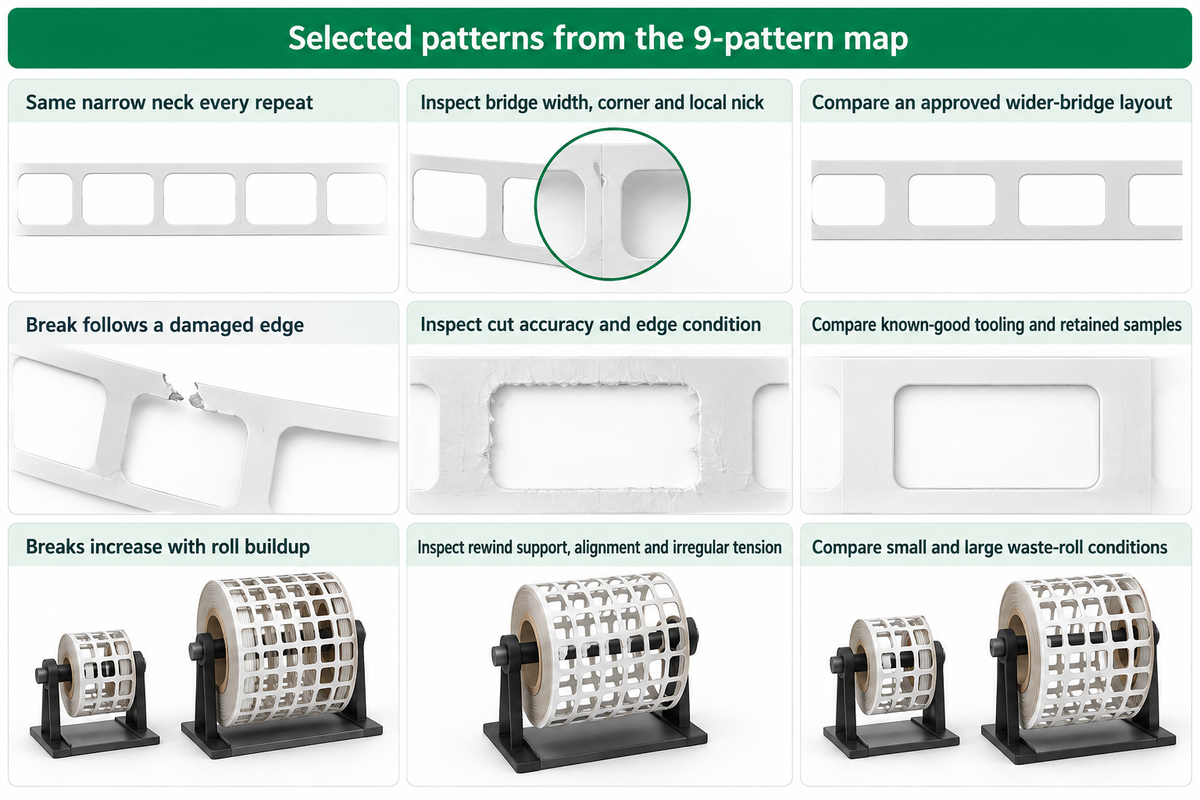
Inspect the narrowest load-bearing bridge, not just the nominal gap between labels. An intricate outline can leave a thin neck beside a wider open area, so record the minimum bridge size. For breaks, indicate the starting position and compare it with the repeat drawing, then inspect the edge of the cut face under a microscope.
Bridge-to-Break Map
| Observed pattern | Inspect first | Useful comparison |
|---|---|---|
| Same narrow neck every repeat | Bridge width, corner and local nick | Approved wider-bridge layout on the same construction |
| Break follows a damaged edge | Cut accuracy and edge condition | Known-good tooling and retained defect samples |
| Breaks increase with roll buildup | Rewind support, alignment and irregular tension | Small and large waste-roll conditions |
| Labels lift with the waste | Separation and release behavior | Label retention as well as break count |
| Film stretches before breaking | Elongation and bridge shape | Matched construction and material direction |
| Wrinkles follow pre-delamination | Rejoining and differential expansion | Approved paths with and without pre-delamination |
| Failure follows a particular roll | Construction, lot and conditioning | Known-good roll on the same job |
| Waste moves in irregular jerks | Where motion first becomes uneven | Path observations at matched operating conditions |
| Waste accumulates after separation | Extraction or collection blockage | Intact peeling versus downstream transport |
Narrow waste sections and difficult shapes constrain stripping, as Spilker describes in its equipment explanation. To convert millimeters to inches, use the label dimension converter with dimensions from the drawings.
Paper and film facestock: strength is only part of the answer
Before you replace stock with a thicker face, compare the actual construction, direction and failure mode. Paper can tear while a plastic film stretches, and a nick can change where either fails. Start with the facestock construction, including any finish or laminate added after printing.
Use ASTM D882-26a to compare tensile properties of plastic film and sheeting below 1.0 mm, controlling thickness, preparation and testing conditions. Assess die-cut waste bridge survival separately and use a different test for paper.
For film, compare tear initiation with ASTM D1004 and tear propagation with ASTM D1938; laboratory rankings can differ from service performance. For paper, record the test supporting the supplier’s data and keep conditioning and moisture exposure consistent.
Use the paper versus film comparison and PET versus BOPP guide to create a shortlist of likely material families.
Release force: match the test to the converting condition
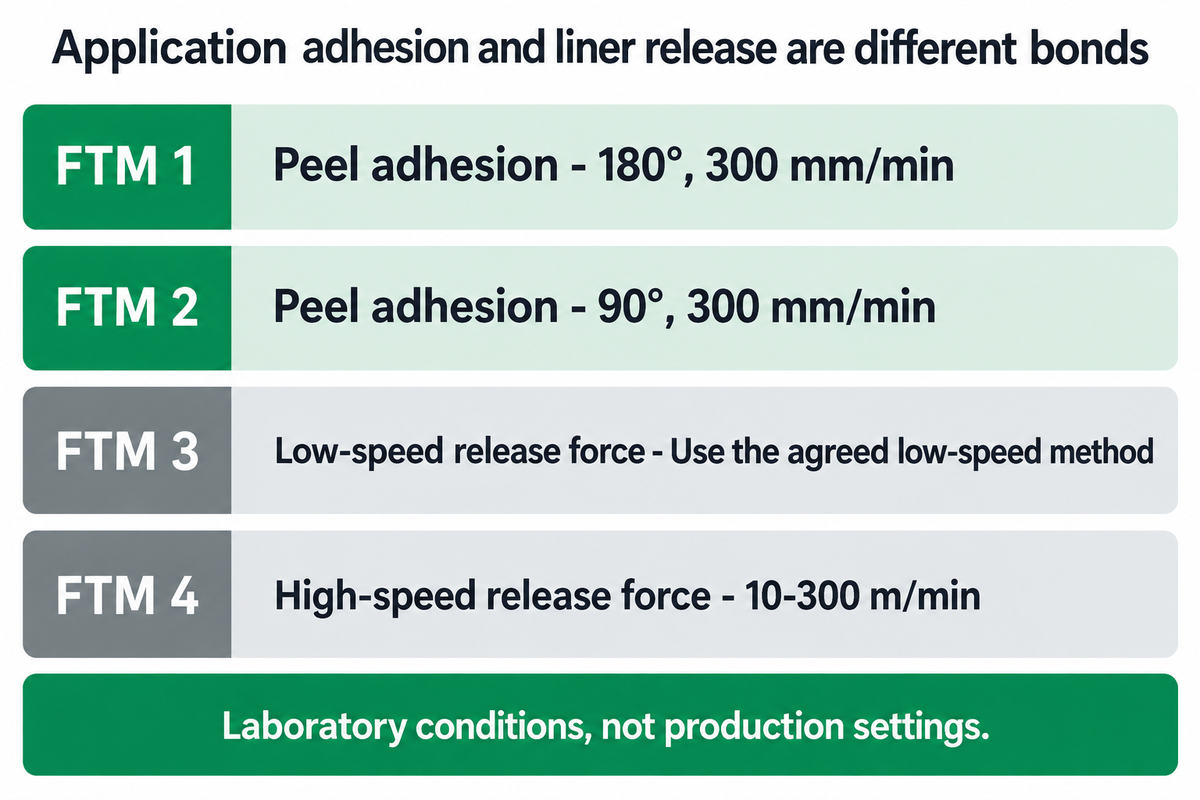
Request product liner-release data sheets that specify the method, speed, width, conditioning and units. A label’s peel adhesion to an application surface measures a different bond. Using that number as the permitted stripping load can lead to the wrong material decision even when both results are expressed as force per width.
| Method | Measurement | Published test condition |
|---|---|---|
| FTM 1 | Peel adhesion | 180°, 300 mm/min |
| FTM 2 | Peel adhesion | 90°, 300 mm/min |
| FTM 3 | Low-speed release force | Use the agreed low-speed method |
| FTM 4 | High-speed release force | 10–300 m/min |
For low-speed testing, FILK describes FTM 3 at 180° and 300 mm/min, typically using 50 mm-wide specimens at least 175 mm long. These are laboratory conditions, not production settings.
Discuss release liner grades for converting for production trials based on release test results, face materials and adhesives. Keep recommended press settings separate from conditions described in FINAT’s test-method list.
Stripping angle and rewind path: change one load at a time
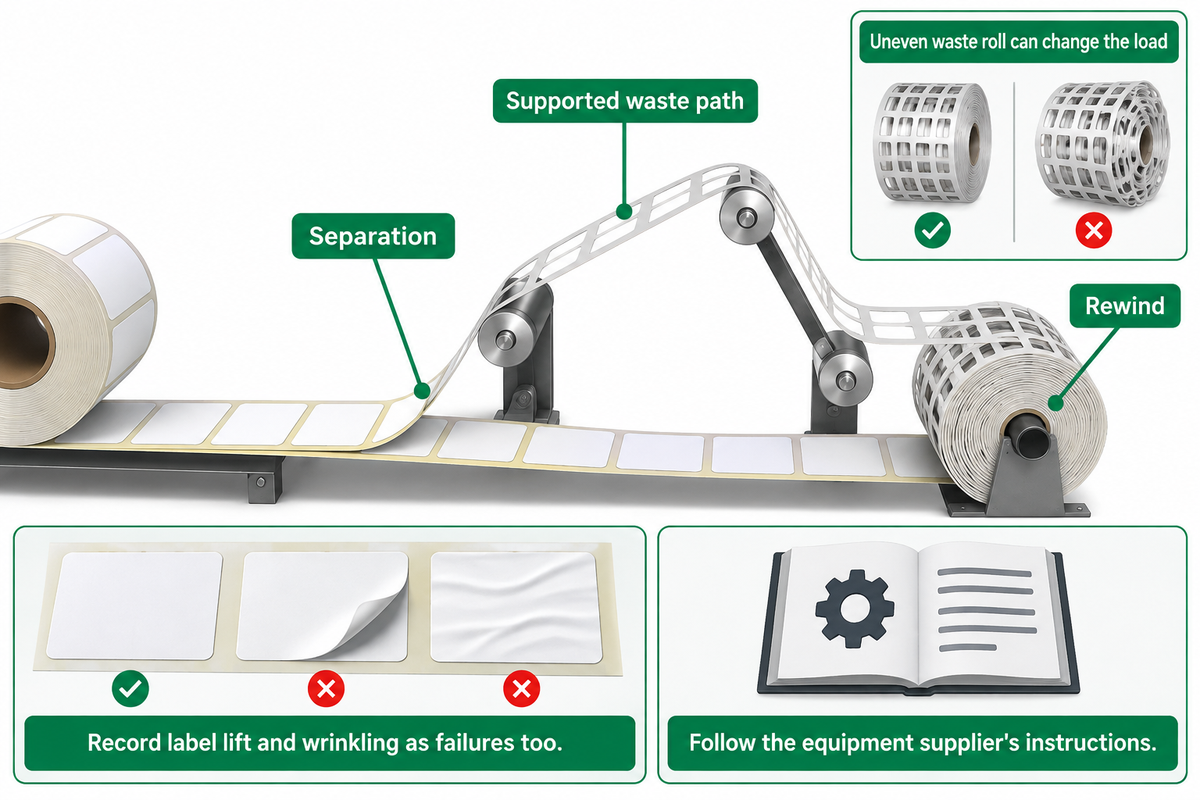
Inspect how the skeleton is supported between separation and rewind. An uneven waste roll can change the load during a run. Record the stripping path and roller support before assuming that the new material is the cause.
Follow Spilker’s advice for adjusting stripping angles based on material and waste geometry. Spilker also states that pre-delamination can reduce release resistance, but different expansion behaviors during rejoining can cause wrinkles or trapped air. The use of delamination and relamination by OMET’s Easy-Strip also relies on machine-specific settings.
How to remove die cut waste without damaging paper?
Support the waste along the approved machine path and compare a known-good construction before increasing pull. Inspect the narrow bridges and cut separation, then change one setup variable within the equipment supplier’s instructions. Record label lift and wrinkling as failures too; a skeleton that stays intact while damaging the saleable labels has not solved the job.
There is a second possible bottleneck after stripping: waste transport and collection. Label & Narrow Web’s 2026 equipment review describes separate handling approaches. A larger extraction unit doesn’t resolve a weak peel point bridge.
Run a controlled material trial
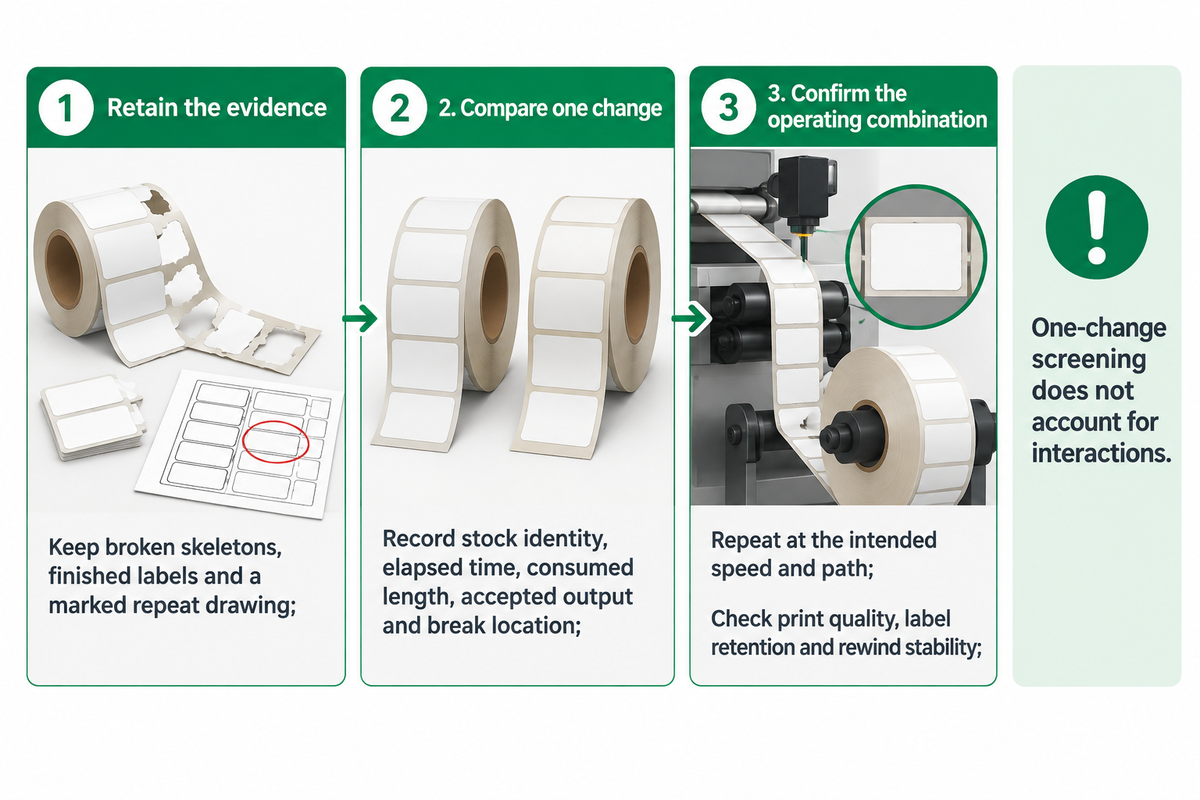
Use a known-good roll as the reference and document the complete set-up on a trial card. A reliable first comparison keeps the label design, tooling, speed, path and conditioning matched. After that, test the chosen construction at the production settings, including the conditions of the waste roll that preceded the original failure.
- Retain the evidence. Keep broken skeletons, finished labels and a marked repeat drawing.
- Compare one change. Record stock identity, elapsed time, consumed length, accepted output and the break location.
- Confirm the operating combination. Repeat at the intended speed and path, checking print quality, label retention and rewind stability.
One-change screening is limited. NIST states, The OFAT approach does not take interactions into account.
A material that works with one path may behave differently with another. Use a designed multi-factor trial when the suspected variables interact; the NIST explanation shows why.
A material premium or a slower press: compare usable output
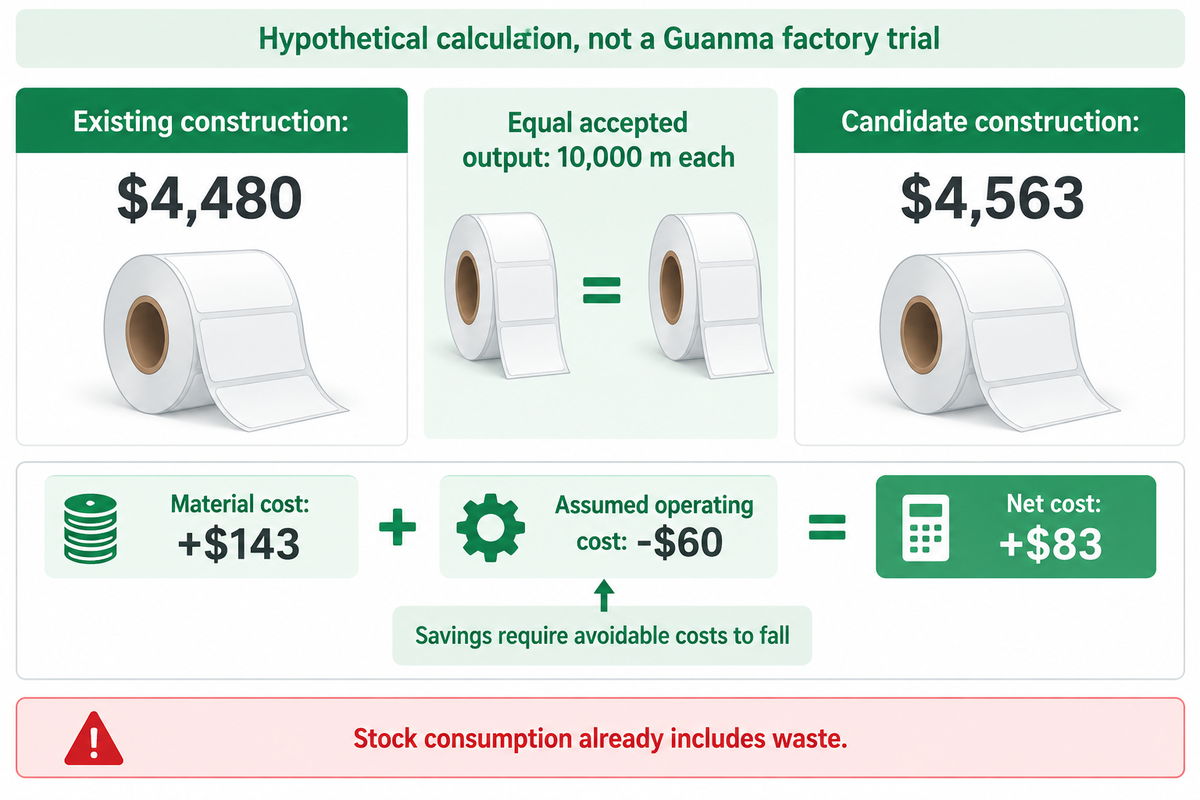
Compare the cost of equal accepted output, including stock consumed during stops and restarts. A quicker candidate may still cost more. For the purposes of this example, both constructions would result in an acceptable 10,000 m of labels, of the same width and layout; $120/hour is an assumed avoidable operating cost, excluding unchanged fixed overhead.
| Cost category or input | Existing construction | Candidate construction |
|---|---|---|
| Accepted output | 10,000 m | 10,000 m |
| Stock consumed | 10,300 m | 10,150 m |
| Excess consumed length | 300 m | 150 m |
| Material price | $0.40/m | $0.42/m |
| Material cost | $4,120 | $4,263 |
| Total occupied time | 3.0 h | 2.5 h |
| Avoidable operating cost | $360 | $300 |
| Compared total | $4,480 | $4,563 |
| Cost per accepted metre | $0.448/m | $0.4563/m |
The candidate adds $143 in material and saves $60 in assumed operating cost. Stock consumption already includes waste: Adding its purchase cost again would double count it. The excess consumed length isn’t the total mass of the normal skeleton.
If savings in time result in no reduction of avoidable costs, the cash saving is zero. Count profitable replacement work separately, without duplicating benefits. ACCA’s relevant cost framework defines the distinction.
Choose supplier support and send a useful trial brief
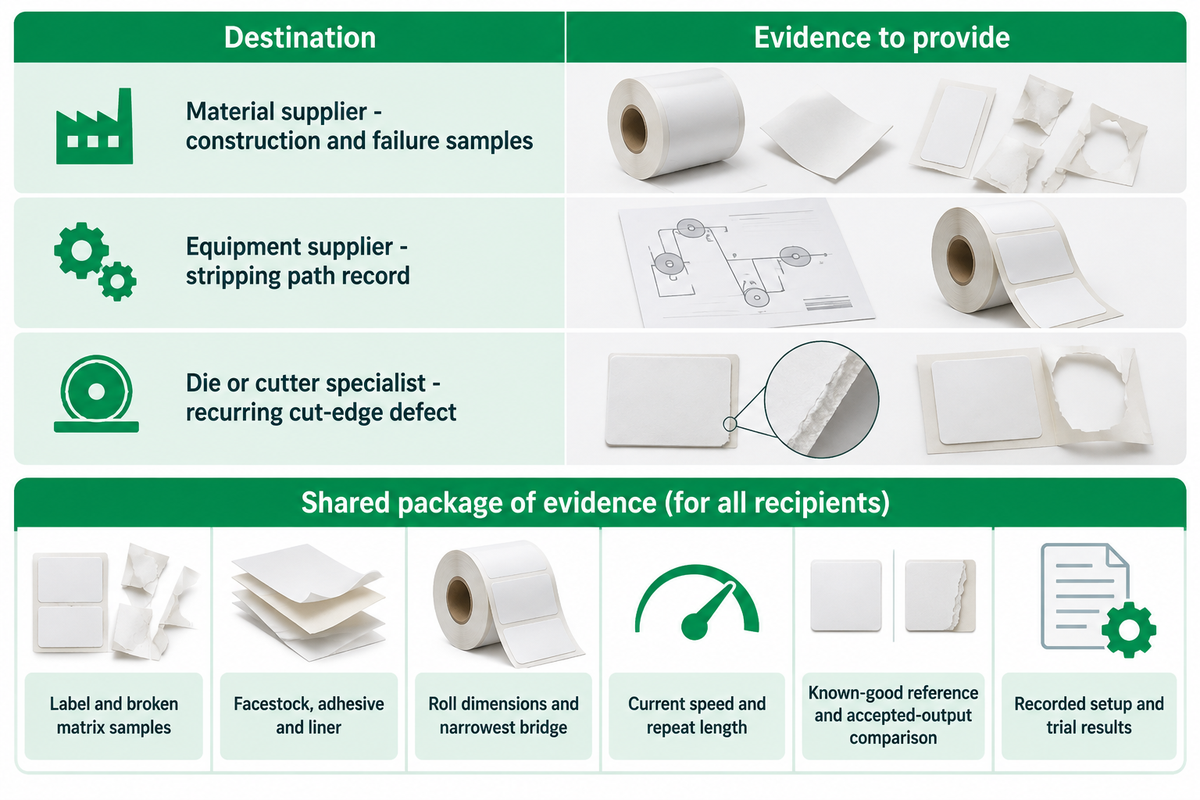
Send the construction and failure samples to the material supplier and the stripping path record to the equipment supplier. If the defect follows a recurring cut edge, contact the die or cutter specialist. These are different investigations, and a professional review is easier when each supplier sees the same marked sample.
For Guanma, find out if the starting point is self-adhesive paper or self-adhesive film. Including the facestock, adhesive, liner, roll dimensions, the narrowest bridge, current speed, and repeat length is necessary. Add the known-good reference and accepted-output comparison so procurement can evaluate a proposed change alongside production.
Send
- Label and broken matrix samples
- Complete material specification
- Recorded setup and trial results
Avoid
- Choosing from thickness alone
- Comparing unmatched test results
- Reporting speed without accepted output
Frequently asked questions
What materials can be die cut?
Paper and plastic films can be die cut into labels and stickers.
The suitable construction depends on the cutter, adhesive and backing as well as the face material. When die-cutting labels on a continuous roll, the waste must remain strong enough to travel through the stripping path. A material that cuts cleanly as an individual sticker may still be difficult to remove as a connected skeleton with narrow bridges.
How long should troubleshooting die-cut paper issues take?
There is no fixed duration: the trial must reproduce the failing condition.
A short run can miss a problem that appears only as the waste roll grows. Record the elapsed time and roll condition at each failure, then repeat the comparison with a known-good construction. Stop the trial if saleable labels lift or wrinkle. Diagnose the affected layer first so that time is spent investigating the relevant material or machine setting.
What is die cut cardstock?
Die cut cardstock is card stock cut into a chosen outline with shaped tooling.
A standalone sheet or card does not necessarily have the adhesive-and-liner construction used for roll labels. Its waste-removal problem may involve lifting pieces from the cutting tool rather than pulling a continuous skeleton. Do not transfer a sheet-cutting remedy directly to a label press: first establish whether the broken piece is the waste bridge, label face or supporting liner.
Should I always pre-delaminate before stripping?
No. Pre-delamination needs a construction-specific trial.
Check for wrinkles, trapped air and label lift as well as fewer breaks. Follow the machine supplier’s setup instructions.
Are liner release force and label peel adhesion the same?
No. Release concerns separation from the liner; peel adhesion concerns the applied label’s bond to a test surface.
Both matter to a usable label, but they answer different questions. Compare release readings only when the test method, specimen width, speed, conditioning and units match. Then confirm that the converted label still meets its application requirements. A steel-panel peel value should not be used as the allowable force for removing the waste skeleton during manufacturing.
Send the substrate sample and current material specification for a trial recommendation.
References and sources
Technical basis: FINAT test methods; ASTM D882, D1004 and D1938; NIST experimental-design guidance; Avery Dennison’s published patent description. Equipment examples come from Spilker and OMET; trade context comes from Label & Narrow Web. All are linked beside the relevant discussion. The cost table is a hypothetical calculation, not a Guanma factory trial.