Liên hệ với Guanma

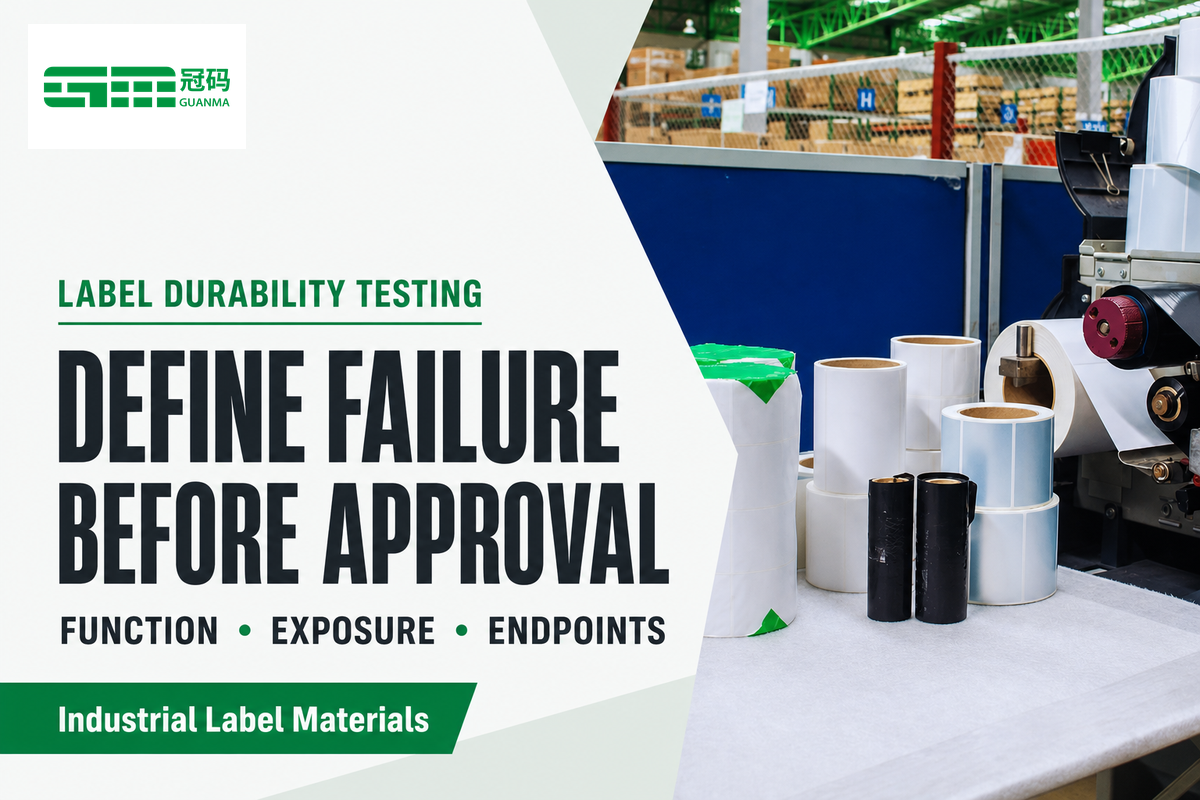
Kiểm tra độ bền của nhãn là đánh giá về sự gắn nhãn và mức độ dễ đọc, nghĩa là nhận dạng có thể đọc được, trong các điều kiện sử dụng dự định.Một thử nghiệm hữu ích bắt đầu với sự thất bại sẽ khiến bạn từ chối nhãn và sau đó căn chỉnh cấu trúc, bề mặt ứng dụng và tiếp xúc với sự thất bại cụ thể đó.Một tên vật liệu hoặc quét thành công có thể giải quyết quyết định mua.
Hướng dẫn này tạo ra một hồ sơ mẫu vật phù hợp với sản xuất, so sánh sàng lọc không chứng minh nguyên nhân và bằng chứng giữ hoặc phát hành cho một cấu trúc nhãn được xác định. sử dụng hướng dẫn tiêu chuẩn liên kết để lựa chọn phương pháp, điều kiện và hạn chế; các quyết định ở đây liên quan đến việc chuẩn bị mẫu vật và bố trí lô hàng đến.
Đối với một người đánh giá kỹ thuật, quá trình chuyển đổi đầy thách thức là từ một mẫu đầy hứa hẹn đến một đơn đặt hàng được phê duyệt. bề mặt nào đã được thử nghiệm?Ruy băng sản xuất có được sử dụng không?Báo cáo có đề cập đến việc xóa sau khi ngưng tụ không?Độ bền của nhãn có vấn đề vì việc nhận dạng bị mất có thể làm gián đoạn mục đích sử dụng của mặt hàng.Bộ câu hỏi được trình bày ở đây chuyển đổi những vấn đề đó thành hồ sơ mẫu vật, so sánh sàng lọc và đánh giá bằng chứng chấp nhận.
Tài liệu này đề cập đến việc sàng lọc vật liệu công nghiệp nói chung. đánh dấu an toàn-quan trọng, nhãn sản phẩm điện, và cảnh báo nguy hiểm-hóa chất đòi hỏi yêu cầu áp dụng riêng của họ. một bài kiểm tra độ bền won’t xác nhận tuân thủ sản phẩm. để giải thích phương pháp thử nghiệm, tham khảo riêng hướng dẫn tiêu chuẩn kiểm tra độ bền nhãn.
Bắt đầu với lỗi nhãn bạn không thể chấp nhận
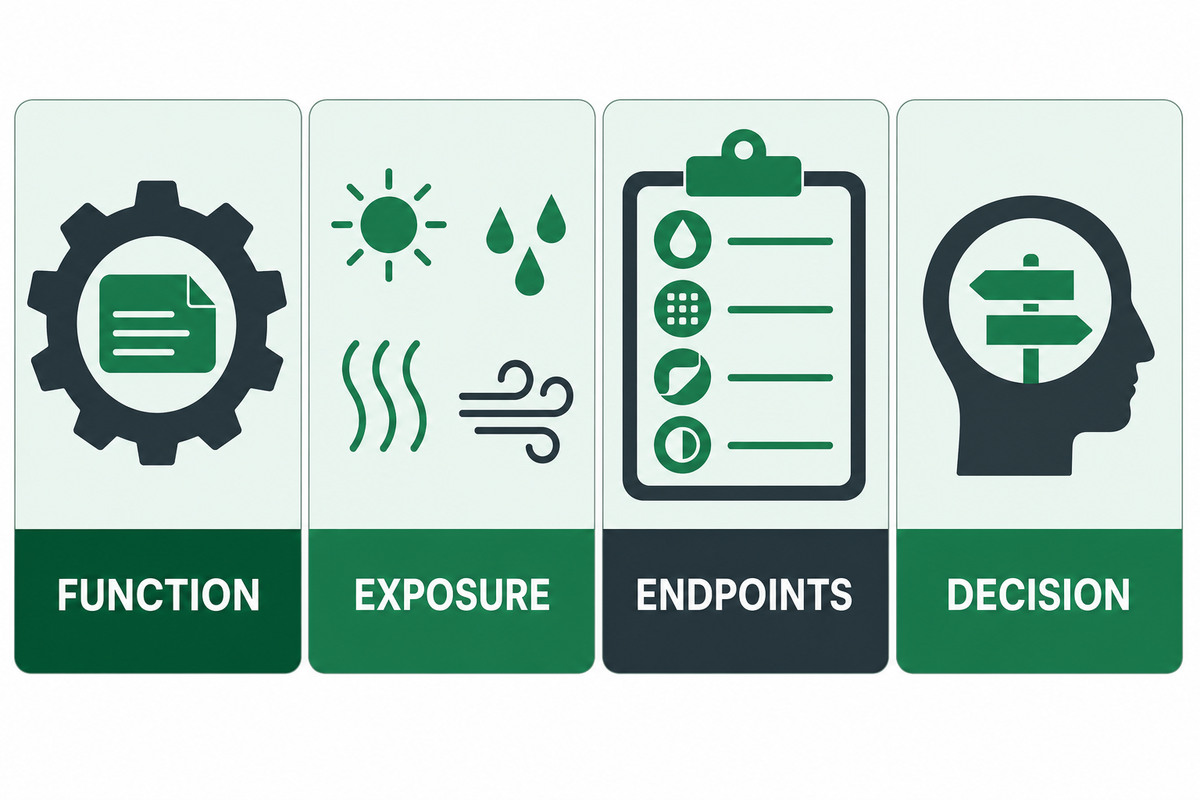
Trước khi yêu cầu kiểm tra, hãy xác định chức năng, mức độ phơi nhiễm và chế độ lỗi có thể quan sát được của nhãn mà Lừa không thể chấp nhận được. Văn bản nhận dạng có thể được yêu cầu duy trì mức độ dễ đọc ngay cả sau khi làm sạch, trong khi mã theo dõi phải đáp ứng yêu cầu chất lượng được chỉ định. xác định ai đánh giá các điểm cuối và bằng chứng hỗ trợ nào là cần thiết để phê duyệt việc xây dựng để sử dụng.
“các phương pháp thử nghiệm và thông tin liên quan tự nó không ngụ ý bất kỳ đặc điểm kỹ thuật nào về hiệu suất liên quan đến các vật liệu được thử nghiệm.”
Yêu cầu cho “nhãn cho môi trường khắc nghiệt” để nhà cung cấp thử nghiệm tự tìm ra. vui lòng viết một tuyên bố ứng dụng thay vào đó. nó nên mô tả nhận dạng in trên một bao vây kết cấu mà Lôi tiếp xúc với ánh sáng ngoài trời và trang web Lừa được đặt tên là chất làm sạch, với văn bản và cạnh cần kiểm tra sau khi tiếp xúc. mô tả những thông tin mà người dùng cần đọc. giải thích lý do mà nhãn phải vẫn dễ đọc. ngoài ra, vui lòng cho biết nồng độ thực tế, nhiệt độ, thời lượng và trình tự xử lý trong đặc điểm kỹ thuật được kiểm soát của bạn.
- Chức năng: nhận dạng, truy xuất nguồn gốc, hướng dẫn vận hành hoặc một nhiệm vụ được xác định khác.
- Phơi nhiễm: chất, kiểu tiếp xúc, điều kiện môi trường và hao mòn.
- Điểm cuối: đính kèm, thiệt hại có thể nhìn thấy, dễ đọc và bất kỳ yêu cầu mã vạch.
- Quyết định: Sàng lọc, Trình độ xây dựng hoặc Kiểm tra theo Thông số kỹ thuật đã được phê duyệt.
Sai lầm thường gặp: chấp nhận “thử nghiệm mài mòn đã qua” mà không có cài đặt phương pháp hoặc quy tắc từ chối.Thử nghiệm nghiêm ngặt vẫn trả lời sai câu hỏi khi thiếu chức năng nhãn yêu cầu.Yêu cầu nhà cung cấp đính kèm các điều kiện đó vào kết quả trước khi so sánh báo giá.
Danh sách rút gọn việc xây dựng nhãn hoàn chỉnh

Xem xét một nhãn bền như một công trình in hoàn chỉnh: facestock, chất kết dính, mực hoặc ruy băng, lớp phủ bảo vệ và laminate.Tất cả các yếu tố phải phù hợp với bề mặt dự định và quy trình in nhãn.Trong khi các gia đình vật liệu giúp thu hẹp danh sách, họ không xếp hạng các hệ thống nhãn đã hoàn thành hoặc chứng minh độ bền của nhãn theo thời gian và liệu nó có chịu được dịch vụ hay không.
Dave Joseph, Giám đốc Giải pháp Sản phẩm tại Armis, thảo luận về bản chất liên quan đến nhau của các thành phần trong phần giải thích của ông Tính năng kỹ thuật Label & Narrow Web’s 2026. giải thích nhà cung cấp của ông cung cấp truyền cảm hứng cho danh sách kiểm tra xây dựng.Nó không phải là dữ liệu thử nghiệm so sánh cho các sản phẩm Guanma.
| Tuyến vật liệu hoặc xây dựng | Câu hỏi trước khi đặt hàng mẫu |
|---|---|
| Màng PET | Hệ thống kết dính, hoàn thiện và in này có đáp ứng các yêu cầu về hình ảnh và tệp đính kèm thực tế không? |
| Màng Polypropylen | Lớp cụ thể có tương thích với việc in ấn, xử lý và hình học ứng dụng không? |
| Giấy tổng hợp | Tên sản phẩm đó mô tả loại polymer và xử lý bề mặt nào? |
| Nhãn Vinyl | Sự kết hợp cấp độ, chất kết dính và in ấn nào đang được đề xuất cho các điều kiện dịch vụ? |
| Xây dựng in được bảo vệ | Lớp phủ ngoài hoặc lớp mỏng có giải quyết được hư hỏng hình ảnh quan sát được không và những thay đổi nào khác? |
của Guanma PET dính phim nhãn chứng khoán, nhãn giấy tổng hợp facestock và các mặt hàng chứng khoán nhãn khác xác định các tuyến đường vật liệu để thảo luận mẫu. vui lòng cung cấp cấp và chi tiết cụ thể của việc xây dựng. Don’t giả sử những tên gia đình đó cho thấy khả năng kháng hóa chất hoặc cuộc sống ngoài trời.
Giới hạn so sánh: Một số vỏ cao hơn không thể tự động quyết định giữa các công trình khác nhau. ASTM D3330/D3330M-04 (2025) cảnh báo rằng độ cứng của lớp nền và tính lưu biến của chất kết dính ảnh hưởng đến so sánh giữa các nhà sản xuất. các phép đo được sử dụng trong phạm vi đã nêu của họ nên được đánh giá liên quan đến các chức năng dự định của ứng viên.
Làm cho mẫu phù hợp với ứng dụng sản xuất
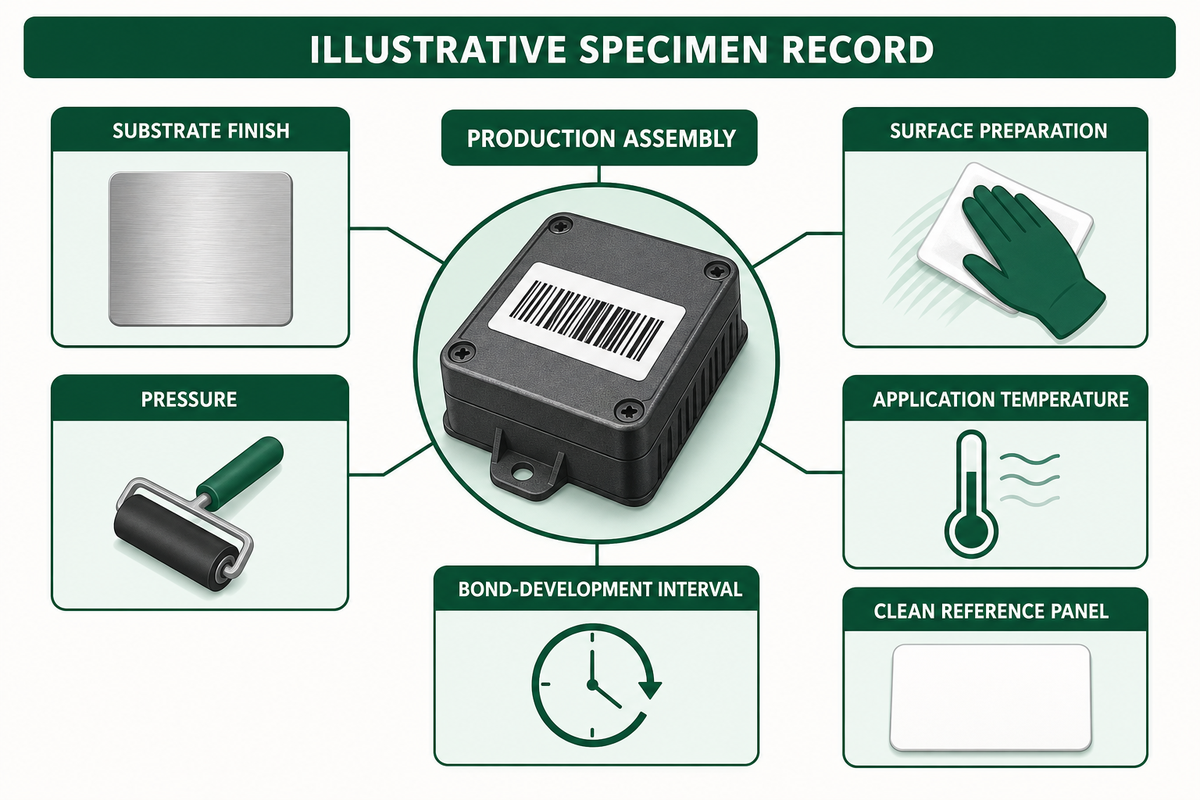
Sản xuất-matched mẫu tái tạo nhãn đề xuất, hình ảnh in, và bề mặt ứng dụng cho quyết định dự định. lưu ý kết thúc chất nền, việc chuẩn bị bề mặt ứng dụng, nhiệt độ ứng dụng, mức độ áp lực và khoảng thời gian cho sự phát triển trái phiếu.Một câu hỏi được đặt ra bởi một điều tra viên có thể được trả lời bằng cách thử nghiệm nhãn trên một bảng điều khiển sạch thuận tiện, mặc dù nó có thể không giải quyết bất kỳ vấn đề tiềm ẩn với lắp ráp sản xuất.
Các Tài liệu lập kế hoạch đánh giá nhãn IoPP liệt kê các biến của chất nền, in ấn và ứng dụng.Nó là một mẫu cũ, không ghi ngày tháng cho một sản phẩm khác và chỉ được sử dụng ở đây trong bối cảnh lập kế hoạch của nó.Các cài đặt thử nghiệm và ví dụ về sự chấp nhận của nó không được chuyển ở đây sang các nhãn công nghiệp.
Năng lượng bề mặt ảnh hưởng đến độ bám dính của nhãn như thế nào?
Đối với chất kết dính, năng lượng bề mặt ảnh hưởng đến làm ướt và tiếp xúc.Có những vấn đề khác như kết cấu bề mặt, ô nhiễm và độ cong ảnh hưởng đến tiếp xúc.“Sticks to plastic” rõ ràng là một đặc điểm kỹ thuật không đầy đủ.Xác định polymer thực tế và kết thúc xử lý bề mặt.So sánh các mẫu vật được chuẩn bị bằng các phương pháp dự định.Không có đảm bảo rằng một giá trị năng lượng bề mặt duy nhất đảm bảo nhãn hoàn thành sẽ vẫn còn nguyên vẹn.
Hồ sơ mẫu vật minh họa: Một người mua đang kiểm tra nhãn cho một bao vây polypropylene kết cấu.Các giữ lại lắp ráp ghi lại vật liệu bao vây và kết thúc, các đề xuất xây dựng PET in, nhận dạng ruy băng, cài đặt máy in, và quá trình làm sạch sản xuất.Các mẫu vật khác cho thấy cùng một nhãn trên một bảng tham chiếu sạch.Không có kết quả được thay thế cho khác.Nếu lắp ráp sản xuất nâng lên ở một cạnh và bảng tham chiếu giữ, hồ sơ kêu gọi một cuộc điều tra về tiếp xúc, hình học và điều kiện ứng dụng.Hiện tại, nó không nhận dạng chất kết dính là khiếm khuyết.Người mua muốn có một so sánh nhắm mục tiêu trước khi chấp nhận thay thế vật liệu hoặc thay đổi trong quá trình làm sạch.
Tách nhiệt độ ứng dụng khỏi nhiệt độ trải qua sau này. xếp hạng nhiệt độ cực đoan don’t mô tả các liên kết hình thành trong quá trình ứng dụng. đảm bảo cả hai bộ điều kiện đều có mặt khi nhãn được áp dụng cho các mặt hàng lạnh hoặc ẩm ướt. bao gồm thiết kế nhãn thực tế trong bài nộp của bạn. kích thước, hình học góc và định vị các yếu tố có thể tác động đến những gì thử nghiệm cần kiểm tra.
Sử dụng Thiết kế phơi sáng 3 nhánh
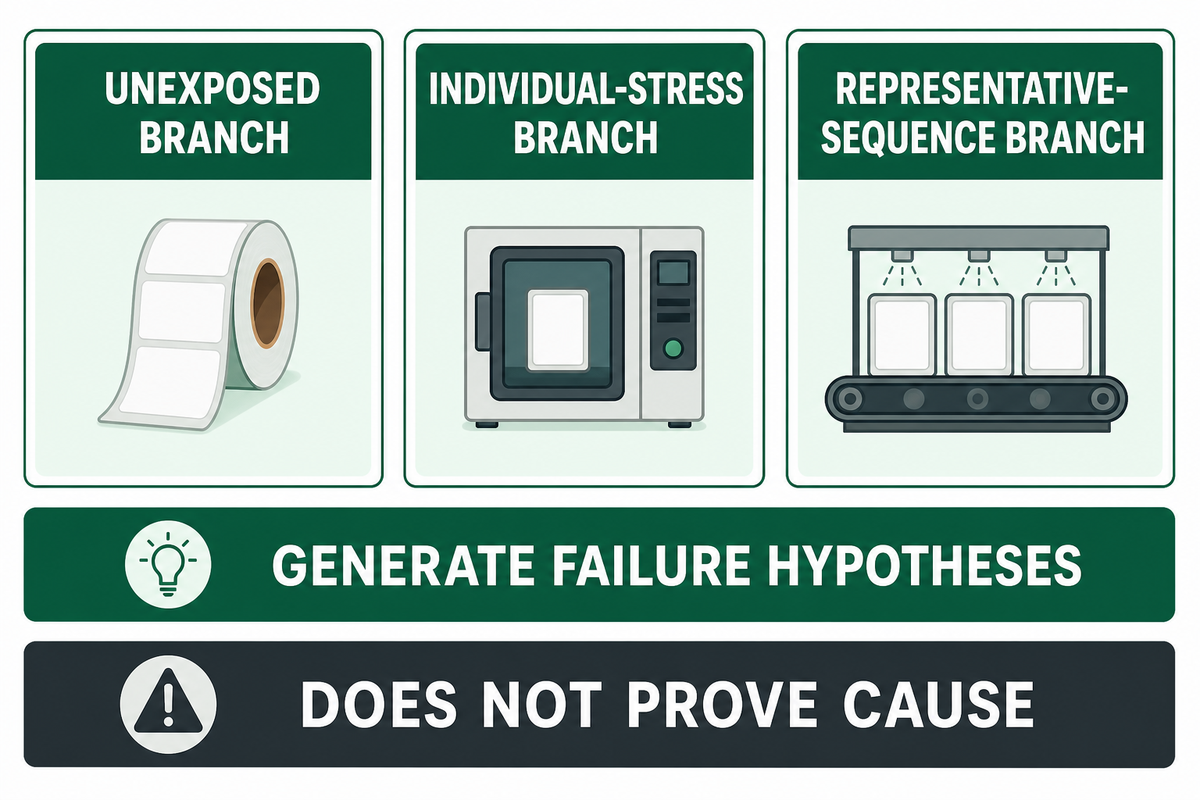
Thiết kế phơi sáng 3 nhánh là một thiết kế khái niệm để giải thích các nhánh của trình tự kiểm tra nhãn: giữ lại các mẫu vật không phơi sáng, kiểm tra các ứng suất riêng lẻ trên các mẫu riêng biệt và chạy một trình tự đại diện trên một nhóm khác.Các nhánh này giúp hình thành các giả thuyết thất bại.Chúng không xác định độc lập các ứng suất tương tác, chứng minh một lớp thất bại hoặc giải thích cho tất cả các trình tự phơi sáng có th.
Cuộc thảo luận của NIST về các thí nghiệm một yếu t giải thích so sánh bị cô lập để lại tương tác chưa được giải quyết. ví dụ, nếu tiếp xúc hóa học làm thay đổi phản ứng với mài mòn ở giai đoạn sau, một chuyên gia có thể cần một thí nghiệm được thiết kế với các kết hợp yếu tố thích hợp, sao chép và kiểm soát biến thể ngẫu nhiên. xem xét ngẫu nhiên hoặc chặn trước khi phân phối mẫu vật.
- nhánh không phơi sáng: giữ lại các mẫu vật phù hợp để ghi lại các phép đo và cung cấp hình thức ban đầu.
- nhánh ứng suất riêng lẻ: sàng lọc phản ứng với các ứng suất xác định bằng cách sử dụng các mẫu vật khác.
- Nhánh trình tự đại diện: phơi bày một nhóm mẫu vật bổ sung theo thứ tự sử dụng được ghi lại và kiểm tra tình trạng trung gian và cuối cùng.
Trình tự minh họa: Một container tái sử dụng được di chuyển từ một khu vực lưu trữ mát mẻ đến một khu vực tải ấm áp, được lau và sau đó tiếp xúc với các container khác. nghiên cứu đề xuất chụp ngưng tụ, lau, và cọ xát tiếp theo theo thứ tự đó. mẫu vật riêng biệt được chịu hoặc để phơi sáng lau hoặc cọ xát được lựa chọn. giả sử nhóm trình tự cho thấy thiệt hại hình ảnh, trong khi các nhóm bị cô lập don.Sau đó, bộ câu hỏi tiếp theo sẽ tập trung xung quanh các điều kiện kết hợp. quan sát này sẽ không chứng minh một cơ chế mài mòn hóa học. chì chất lượng giữ ứng cử viên và yêu cầu nhà cung cấp thử nghiệm thay đổi các yếu tố được lựa chọn và thứ tự phơi sáng trong một thiết kế thử nghiệm phù hợp.
Để so sánh thời tiết tăng tốc, bao gồm một vật liệu hiệu suất đã biết phù hợp được phơi sáng cùng với các ứng cử viên, theo khuyến nghị của ASTM G151-26.Một nhãn giữ lại không phơi sáng và một kiểm soát tiếp xúc trả lời các câu hỏi khác nhau. ghi lại vai trò của mỗi kiểm soát, và đảm bảo một số lượng đầy đủ các mẫu vật cho các phép đo sao chép và phá hủy đã thỏa thuận.Một nghiên cứu có thể mô phỏng các điều kiện thực tế được lựa chọn; nó không thể tái tạo mọi lịch sử dịch v.
Chọn các bài kiểm tra trả lời các câu hỏi thất bại của bạn
Chọn các phương pháp kiểm tra nhãn dựa trên câu hỏi thất bại, điểm cuối đo lường và giới hạn của phương pháp. độ bám dính, mài mòn hình ảnh in, kiểm tra khả năng kháng hóa chất và thời tiết kiểm tra các đặc tính khác nhau.Một báo cáo cần cả cài đặt phơi sáng và quy tắc chấp nhận đã thỏa thuận; một số tiêu chuẩn hoặc thời lượng phòng thí nghiệm một mình có thể’t thiết lập chất lượng và độ bền cần thiết trong dịch v.
ASTM D5264-98(2019) mô tả so sánh dựa trên phòng thí nghiệm về khả năng chống mài mòn cho vật liệu in. phạm vi công cộng của nó xem xét các yếu tố liên quan đến mực, lớp phủ, tấm mỏng và chất nền trong khi sử dụng các tiêu chí được xác định trước. xác nhận rằng phương pháp đã chọn phù hợp với hình dạng mẫu và loại hư hỏng bạn muốn đánh giá.Đối với kết quả bóc vỏ FINAT FTM 1 hoặc FTM 2, hãy ghi lại tốc độ 300 mm/phút được chỉ định bằng phương pháp; cài đặt đó không phải là giới hạn chấp nhận lô.
Tham chiếu đầu vào thử nghiệm: Sử dụng ma trận này để ghi lại phơi nhiễm, điểm cuối quan sát và điều kiện cho một mẫu vật phù hợp với sản xuất.Nó không phải là một phương pháp thử nghiệm, một giới hạn vượt qua hoặc một quy tắc phát hành hàng loạt.Để lựa chọn phương pháp và giới hạn, sử dụng riêng biệt hướng dẫn tiêu chuẩn kiểm tra độ bền nhãn.
| Tiếp xúc hoặc thử nghiệm | Điểm cuối | Điều kiện báo cáo | Giới hạn quyết định |
|---|---|---|---|
| Mài mòn khô | Mất hình ảnh hoặc hư hỏng bề mặt | Vật liệu tiếp xúc, tải trọng, chuyển động và chu kỳ | Không đại diện cho lau ướt |
| Mài mòn ướt | Bôi nhọ, chuyển giao và dễ đọc | Điều kiện lỏng, làm ướt và cọ xát | Vấn đề nhận dạng chất lỏng |
| Tiếp xúc điểm hóa học | Sự đổi màu cục bộ hoặc hư hỏng | Chất, nồng độ và thời gian tiếp xúc | Không phải là một kết quả ngâm |
| Ngâm hóa học | Hình ảnh, phim và tình trạng đính kèm | Chất lỏng, nhiệt độ, thời gian và phục hồi | Có thể khác với tiếp xúc không liên tục |
| Độ bám dính bóc tách | Chế độ lực và lỗi quan sát được | Bề mặt, nơi ở, góc, tốc độ và chiều rộng | Không thể một mình dự đoán cuộc sống chức năng |
| Giữ tĩnh hoặc cắt | Di chuyển hoặc mất giữ | Hình học, tải trọng, thời gian và nhiệt độ | Không phải là đo lường vỏ |
| Chu kỳ nhiệt độ | Nâng, biến dạng hoặc thay đổi hình ảnh | Giới hạn, nơi ở, chuyển tiếp và độ ẩm | Sử dụng lịch sử phơi nhiễm có liên quan |
| Ngưng tụ hoặc độ ẩm | Điều kiện đính kèm và hình ảnh | Trình tự ướt/khô và thời gian kiểm tra | Kiểm tra khô một mình có thể bỏ lỡ hành vi |
| Ánh sáng và thời tiết | Thay đổi thuộc tính và khả năng đọc | Phổ, bức xạ, nhiệt độ và làm ướt | Không có chuyển đổi phổ quát theo giờ sang năm |
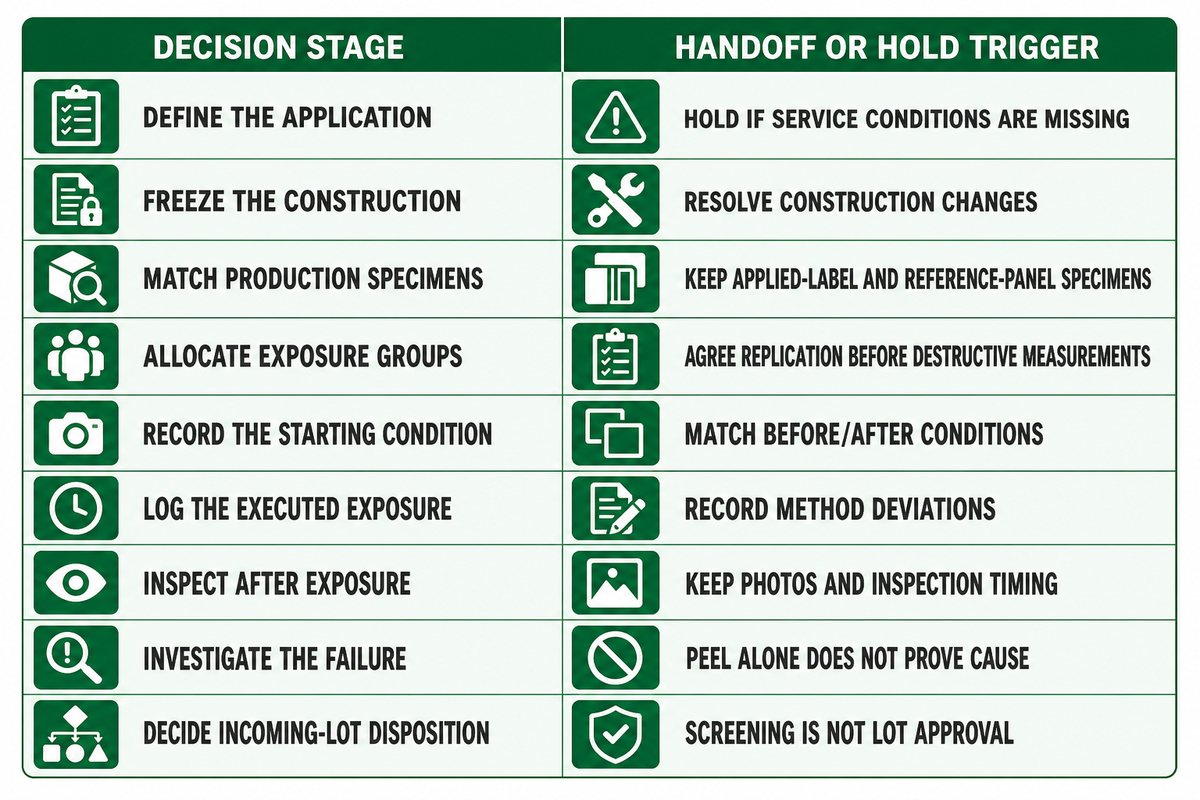
Đưa các đầu vào và quan sát thử nghiệm này vào hồ sơ mẫu và chuyển giao quyết định bên dưới; kết quả sàng lọc vẫn không xác lập được sự chấp thuận của lô hàng đến.
| Giai đoạn quyết định | Hồ sơ bắt buộc | Chủ sở hữu có trách nhiệm | Kích hoạt handoff |
|---|---|---|---|
| Định nghĩa ứng dụng | Chức năng, bề mặt thực tế, hoàn thiện, hình học và xử lý | Kỹ thuật | Giữ gói nếu thiếu điều kiện dịch vụ |
| Chốt cấu trúc | Facestock, chất kết dính, mực hoặc ruy băng, lớp phủ, laminate và sửa đổi lô | Mua sắm và chuyển đổi | Giải quyết thay đổi xây dựng trước khi mẫu vật được chuẩn bị |
| Phù hợp với mẫu vật sản xuất | Chất nền thực tế, chuẩn bị bề mặt, cài đặt in, tệp đính kèm và nhận dạng bảng tham chiếu | Chất lượng sản xuất | Giữ lại cả hai cụm; không thay thế kết quả bảng điều khiển bằng kết quả nhãn áp dụng |
| Phân bổ các nhóm tiếp xúc | Các biện pháp kiểm soát không tiếp xúc, các nhóm căng thẳng riêng lẻ và trình tự ướt/khô đại diện | Chủ test | Đồng ý sao chép và phân bổ mẫu vật trước khi đo phá hủy |
| Ghi lại điều kiện bắt đầu | Hình ảnh xuất hiện, điều kiện cạnh ban đầu, chất lượng in và khả năng đọc | Chất lượng | Sử dụng các điều kiện đo phù hợp để so sánh trước/sau |
| Ghi lại mức độ phơi nhiễm đã thực hiện | Nồng độ hóa học thực tế, thời gian tiếp xúc chất lỏng, nhiệt độ, làm ướt, tải trọng cọ xát và chu kỳ, hoặc phổ ánh sáng và bức xạ khi được chỉ định | Nhà cung cấp thử nghiệm | Ghi lại những sai lệch so với phương pháp đã thỏa thuận; không có chuyển đổi phổ quát theo giờ sang năm |
| Kiểm tra sau khi tiếp xúc | Mất hình ảnh có thể nhìn thấy, bôi nhọ, chuyển giao, đổi màu, biến dạng, chuyển động, đính kèm và điều kiện phục hồi | Chất lượng | Giữ ảnh với thời gian kiểm tra; chỉ kiểm tra khô có thể bỏ lỡ hành vi ướt |
| Điều tra thất bại | Chế độ lỗi quan sát được, lực bong tróc nếu đo, giả thuyết lớp bị ảnh hưởng và so sánh có kiểm soát tiếp theo | Người đánh giá kỹ thuật | Một phép đo vỏ không thể một mình dự đoán tuổi thọ chức năng hoặc chứng minh lớp thất bại |
| Vứt bỏ lô hàng đến | Nhận dạng công trình, hồ sơ mẫu vật, kế hoạch lấy mẫu được phê duyệt, tiêu chí được ủy quyền và lý do quyết định | Chủ sở hữu phát hành được ủy quyền | Chấp nhận, từ chối hoặc giữ theo kế hoạch đã thống nhất; kết quả sàng lọc không phải là sự chấp thuận của lô hàng |
ASTM G151-26 Cảnh báo chống lại một yếu tố tăng tốc chung từ thời gian phòng thí nghiệm đến năm thế giới thực.Phải có dữ liệu thực tế để hỗ trợ mối tương quan cho một vật liệu cụ thể và một môi trường cụ thể.Sử dụng tiếp xúc với tia cực tím để so sánh các ứng cử viên trong một phạm vi cụ thể của nghiên cứu.Giữ một sự tách biệt giữa một yêu cầu ngoài trời-cuộc sống và kết quả phòng thí nghiệm.Ánh sáng tia cực tím là một trong những biến tiếp xúc; điều kiện cực đoan được sử dụng mà không có cơ sở ứng dụng có thể gây ra một chế độ thất bại khác nhau.
Xác định vị trí lớp không thành công trước khi nâng cấp vật liệu
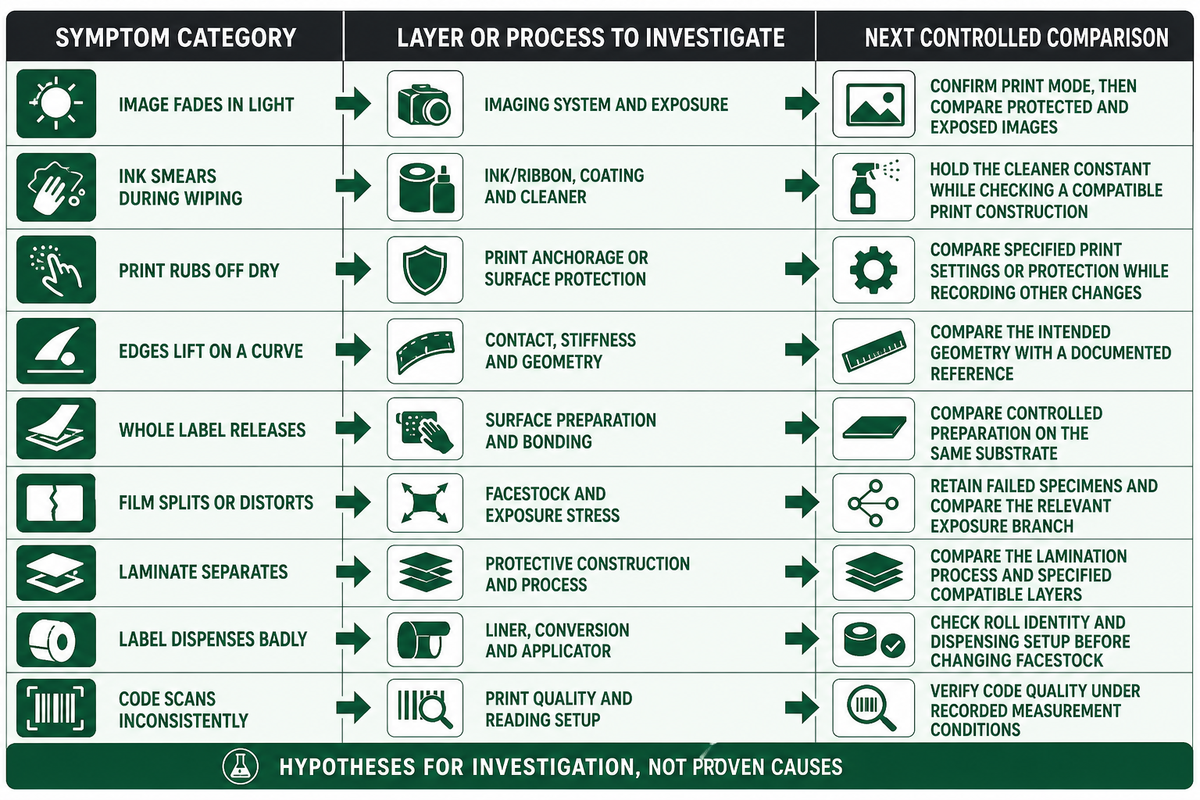
Đầu tiên, mô tả các triệu chứng bạn đã quan sát trong sản xuất và chọn một so sánh cho phép bạn kiểm tra một nguyên nhân có thể. các triệu chứng thất bại như mờ dần, bôi nhọ, nâng cạnh, và các vấn đề lót có thể liên quan đến các cấp độ khác nhau của việc xây dựng hoặc quá trình.Bảng chẩn đoán lớp thất bại có chứa một tập hợp các câu hỏi tiếp theo; xuất hiện một mình có thể’t xác định lớp thất bại hoặc biện minh cho sự chấp thuận của một thay th.
ASTM D3330/D3330M-04(2025) hạn chế sự quy kết của một nguyên nhân từ kết quả bóc kể từ khi cả một sự ủng hộ và một chất kết dính có thể ảnh hưởng đến phản ứng. giữ các bức ảnh và chế độ thất bại quan sát với phép đo. không gọi mỗi đo thấp một thất bại dính.
| Loại triệu chứng | Lớp hoặc quy trình để điều tra | So sánh có kiểm soát tiếp theo |
|---|---|---|
| Hình ảnh mờ dần trong ánh sáng | Hệ thống hình ảnh và phơi sáng | Xác nhận chế độ in, sau đó so sánh hình ảnh được bảo vệ và tiếp xúc |
| Vết mực trong quá trình lau | Mực/ruy băng, lớp phủ và chất tẩy rửa | Giữ hằng số sạch hơn trong khi kiểm tra cấu trúc in tương thích |
| In chà khô | In neo hoặc bảo vệ bề mặt | So sánh cài đặt in hoặc bảo vệ được chỉ định trong khi ghi lại các thay đổi khác |
| Các cạnh nâng lên trên một đường cong | Tiếp xúc, độ cứng và hình học | So sánh hình học dự định với một tài liệu tham khảo |
| Phát hành toàn bộ nhãn | Chuẩn bị bề mặt và liên kết | So sánh chế phẩm được kiểm soát trên cùng một chất nền |
| Phim bị chia tách hoặc bóp méo | Facestock và căng thẳng tiếp xúc | Giữ lại các mẫu bị lỗi và so sánh nhánh phơi nhiễm có liên quan |
| Laminate tách | Xây dựng và quy trình bảo vệ | So sánh quá trình cán màng và các lớp tương thích được chỉ định |
| Nhãn phân phối xấu | Lớp lót, chuyển đổi và bôi | Kiểm tra danh tính cuộn và thiết lập phân phối trước khi thay đổi facestock |
| Code quét không thống nhất | Chất lượng in và thiết lập đọc | Xác minh chất lượng mã trong các điều kiện đo được ghi lại |
Kiểm tra chế độ hình ảnh trên máy in nhãn trước khi mua ruy băng mới. truyền nhiệt và nhiệt trực tiếp là các tuyến in khác nhau; thay đổi ruy băng thuộc về truyền nhiệt. với truyền nhiệt, xem xét ruy băng được đề xuất và bề mặt in. thay thế của bộ phim trong khi thay đổi năng lượng in hoặc ruy băng để lại một số giải thích hỗn hợp.
Khi nhãn không thành công trong môi trường công nghiệp khắc nghiệt, hãy bảo quản các mẫu không thành công.Một hình ảnh có thể trở nên không thể đọc được, nhưng nếu nhãn vẫn được gắn, việc mua một chất kết dính mạnh hơn có khả năng không giải quyết được sự thất bại mà bạn đã quan sát. ghi lại giả thuyết của bạn, so sánh đầu vào có liên quan và suy nghĩ lại toàn bộ ứng cử viên một khi nguyên nhân được hiểu rõ hơn.
Phát hành hàng loạt riêng biệt từ chất lượng vật liệu
Quá trình đánh giá chất lượng vật liệu xác định xem việc xây dựng nhãn có phù hợp với một ứng dụng cụ thể hay không. Quá trình kiểm tra lô xem xét một lô cụ thể và liệu nó có đáp ứng một đặc điểm kỹ thuật được phê duyệt trong kế hoạch kiểm tra và lấy mẫu hiện hành hay không. Bất kỳ mẫu sàng lọc thành công nào cũng không đủ để đưa ra kết luận về một trong hai khía cạnh.Trong hồ sơ, giữ lại bằng chứng xây dựng, nhận dạng lô và thẩm quyền phát hành cổ phiếu.
ISO 2859-1:2026 địa chỉ chấp nhận lấy mẫu theo thuộc tính cho kiểm tra lô-by-lô, với các chương trình được lập chỉ mục bởi giới hạn chất lượng chấp nhận. mô tả công khai của nó liên quan đến loạt các lô. một lô bị cô lập cần một đánh giá phù hợp của phương pháp lấy mẫu; không chuyển tiếp tiếp tục-lô quy tắc mà không kiểm tra các giả định của h.
Bảng bằng chứng xử lý lô được cung cấp như một trợ giúp biên tập cho việc chuyển giao chấp nhận. mẫu doesn’t cung cấp kích thước mẫu, số chấp nhận hoặc bảo đảm thống kê. mô tả riêng đơn vị kiểm tra, định nghĩa lỗi, kế hoạch lấy mẫu áp dụng, cơ sở rủi ro của nhà sản xuất/người tiêu dùng và trách nhiệm phát hành.Nếu các dịch vụ kiểm tra cung cấp báo cáo, hãy đồng ý về những trách nhiệm này trước khi các mẫu rời khỏi trang web của bạn.
Ví dụ về quyết định giữ: Một cuộn đến chứa tên của sản phẩm đã biết, nhưng hồ sơ xây dựng có mã kết dính khác. trình độ trước đó áp dụng cho chất kết dính trước đó có trên vỏ thực tế. do đó, hồ sơ nêu rõ “giữ xem xét xây dựng đang chờ xử lý” và xác định cuộn bị ảnh hưởng, và tham chiếu đến đặc điểm kỹ thuật đã được phê duyệt.Mua sắm yêu cầu nhà cung cấp cung cấp thông tin thay đổi.Chất lượng sẽ đánh giá bằng chứng và xác định những gì cần được đánh giá lại và bằng chứng nào có thể áp dụng, sau đó áp dụng kế hoạch chấp nhận được ủy quyền trước khi xử lý.Đối với ví dụ này, không có số lượng mẫu vượt qua được giả định và tên sản phẩm đã biết không được coi là có nghĩa là lô thay đổi đủ điều kiện.
- Nhận dạng: lô, sửa đổi xây dựng, hệ thống in và thông số kỹ thuật được phê duyệt.
- Bằng chứng: hồ sơ mẫu vật, báo cáo thử nghiệm, kết quả thực tế và sai lệch.
- Cơ sở chấp nhận: kế hoạch áp dụng và tiêu chí được ủy quyền.
- Xử lý: Chấp nhận, từ chối hoặc giữ và nêu rõ lý do cũng như người đưa ra quyết định.
Tuyên bố “cùng chất lượng nhãn” của nhà cung cấp không phải là đóng cửa của một thay đổi xây dựng được ghi lại. giải quyết thay đổi trước khi phát hành cổ phiếu, và giữ bằng chứng thay đổi có sẵn như một bản ghi.
Giữ Khả năng đọc mã vạch trong Kế hoạch đủ điều kiện tiếp theo
Chất lượng mã vạch nên được bao gồm trong kế hoạch tiếp xúc nơi một giải pháp nhận dạng bền dựa trên một mã vạch. ghi lại chất lượng trước và sau khi mã vạch đã được chịu các ứng suất được lựa chọn trong cùng điều kiện đo lường.Một nhãn có thể ở lại dán ngay cả khi độ tương phản in hoặc các thuộc tính khác theo yêu cầu của hệ thống đọc bị mất. như vậy, gắn nhãn và chấp nhận mã vạch phải được biện minh bằng bằng chứng riêng biệt.
Về mặt mã vạch, Hướng dẫn 2D-in-retail của GS1 phác thảo mục tiêu của ngành công nghiệp là có các hệ thống điểm bán hàng (POS) có khả năng đọc và xử lý mã 2D cùng với mã tuyến tính vào cuối năm 2027. khung thời gian này dành riêng cho bán lẻ và không phải là thời hạn toàn ngành cho nhãn mã vạch công nghiệp. tuy nhiên, nó minh họa rằng người ta nên xem xét việc mất chất lượng trong khung thời gian giữa in và quét cuối cùng.
Tại sao không chỉ sử dụng máy quét mã vạch?
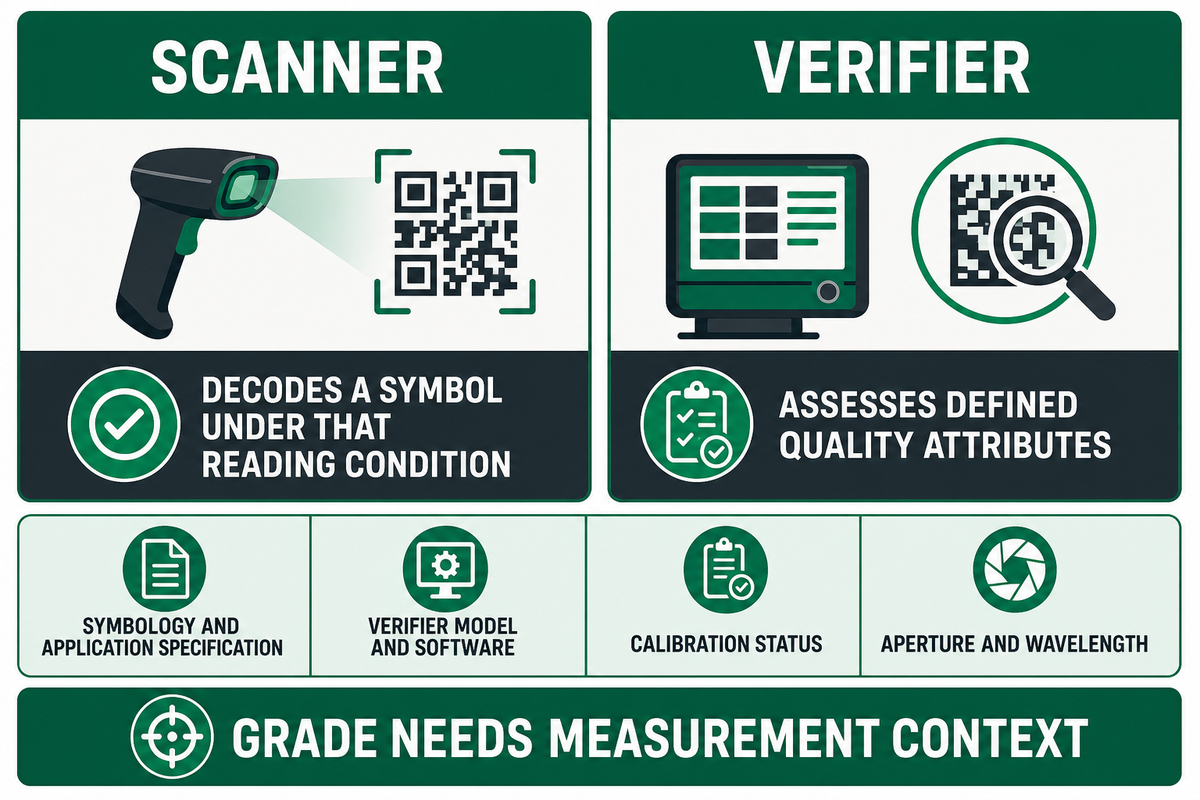
Một máy quét cho thấy nếu thiết bị đó có thể giải mã một biểu tượng trong những điều kiện đọc đó.Một người xác minh đánh giá các thuộc tính chất lượng được xác định.Chụp các ký hiệu và đặc điểm kỹ thuật ứng dụng, mô hình và phần mềm xác minh, trạng thái hiệu chuẩn, khẩu độ và bước sóng.Giữ cho các điều kiện đó ổn định qua so sánh; không có bối cảnh đo lường, một lớp có thể gây hiểu nhầm.
ISO/IEC 15415:2024, được xuất bản vào tháng 12 năm 2024, tập trung vào việc đánh giá và phân loại chất lượng in của các ký hiệu hai chiều.Nó không cung cấp đánh giá nhãn đầy đủ chống lại các điều kiện khắc nghiệt.Chọn phương pháp chất lượng áp dụng cho các ký hiệu 1D và 2D đang sử dụng, và nêu mức độ chấp nhận trong đặc tả ứng dụng.
Bao gồm tất cả các thông tin liên quan liên quan đến tác phẩm nghệ thuật và quy trình in cùng với kích thước mã thực tế và trình tự làm sạch hoặc xử lý cần thiết cho lần đánh giá trình độ tiếp theo. đánh giá độ bền của nhãn in trong điều kiện thực tế và xác định xem nhãn có còn nguyên vẹn hay không và nếu mã giữ được chất lượng yêu cầu. giữ báo cáo này với hồ sơ xây dựng. xác minh mã vạch cũng không đảm bảo rằng một trang web được liên kết sẽ vẫn hoạt động trong vòng đời của nhãn.
Câu hỏi thường gặp
Làm thế nào để bạn kiểm tra độ bền?
Bước đầu tiên là xác định môi trường, xử lý và thất bại làm cho nhãn không thể chấp nhận được. in xây dựng đề xuất và áp dụng nó cho bề mặt thực t.
Bước đầu tiên là xác định môi trường, xử lý và thất bại làm cho nhãn không thể chấp nhận được. in xây dựng đề xuất và áp dụng nó cho bề mặt thực tế. giữ mẫu so sánh, chọn phơi sáng có liên quan, và so sánh đính kèm, xuất hiện và dễ đọc với các tiêu chí đã thỏa thuận.
Các nhóm căng thẳng riêng biệt có thể được sử dụng để sàng lọc, nhưng các tương tác và hiệu ứng thứ tự phơi nhiễm đòi hỏi một thiết kế thử nghiệm phù hợp trước khi một nguyên nhân có thể được yêu cầu.Giữ báo cáo liên kết với bản sửa đổi xây dựng, cài đặt in và hồ sơ ứng dụng.Nếu mục tiêu là chấp nhận lô, cũng xác định kế hoạch lấy mẫu áp dụng và cơ quan phát hành, vì một vài mẫu sàng lọc thành công don’t có nghĩa là chấp nhận lô là hợp lý.
Label test là gì?
Một thử nghiệm nhãn đánh giá một hoặc nhiều thuộc tính của hệ thống nhãn thành phẩm trong các điều kiện đã nêu.Nó có thể giải quyết giữ chất kết dính, mài mòn hình ảnh in, phản ứng hóa học, phong hóa, hoặc chất lượng mã vạch.
Một thử nghiệm nhãn đánh giá một hoặc nhiều thuộc tính của hệ thống nhãn thành phẩm trong các điều kiện đã nêu.Nó có thể giải quyết việc giữ chất kết dính, mài mòn hình ảnh in, phản ứng hóa học, phong hóa hoặc chất lượng mã vạch.Trong trường hợp này, thử nghiệm nhãn đề cập đến nhãn vật lý và thông tin đã được in trên nhãn.Nó không bao gồm việc đánh giá giá trị dinh dưỡng của sản phẩm hoặc tuân thủ từng yêu cầu pháp lý đối với các từ trên bao bì.
Chất liệu nhãn bền nhất là gì?
Không có ‘một vật liệu duy nhất hoạt động cho mọi bề mặt, tiếp xúc hóa học và mô hình xử lý.Một số tùy chọn có thể bao gồm polyester, polypropylene, công trình xây dựng của giấy tổng hợp, và nhãn vinyl, tùy thuộc vào các giới hạn cụ thể cấp.
Không có’một vật liệu duy nhất hoạt động cho mọi bề mặt, tiếp xúc hóa học và mô hình xử lý.Một số tùy chọn có thể bao gồm polyester, polypropylene, công trình của giấy tổng hợp, và nhãn vinyl, tùy thuộc vào giới hạn cụ thể cấp.Hiệu suất nhãn cũng bị ảnh hưởng bởi hệ thống kết dính, phương pháp in, lớp phủ và cán màng.Trước khi phê duyệt một vật liệu để sử dụng, đánh giá các lựa chọn thay thế trong các điều kiện có liên quan, và sử dụng các phương pháp thích hợp.
Tiêu chuẩn ISO để ghi nhãn là gì?
Các tiêu chuẩn khác nhau giải quyết các câu hỏi khác nhau. ISO/IEC 15415:2024 liên quan đến chất lượng in mã vạch 2D; ISO 2859-1:2026 liên quan đến việc lấy mẫu chấp nhận từng lô theo thuộc tính. không thiết lập kiểm tra độ bền nhãn phổ quát hoặc giới hạn vượt qua phổ quát.
Các tiêu chuẩn khác nhau giải quyết các câu hỏi khác nhau. ISO/IEC 15415:2024 liên quan đến chất lượng in mã vạch 2D; ISO 2859-1:2026 liên quan đến việc lấy mẫu chấp nhận từng lô theo thuộc tính. không thiết lập kiểm tra độ bền nhãn phổ quát hoặc giới hạn vượt qua phổ quát. xác định tài sản và ứng dụng trước, sau đó có được phương pháp áp dụng và đặc điểm kỹ thuật chấp nhận.
Một thử nghiệm độ bền nhãn nên sử dụng bao nhiêu mẫu?
Trước khi quyết định kế hoạch lấy mẫu, hãy mô tả các công trình, chất nền, quy trình in và các nhóm đơn vị phơi nhiễm. bao gồm thảo luận về sao chép thích hợp và phân bổ mẫu vật cho các phép đo phá hủy.
Trước khi quyết định kế hoạch lấy mẫu, hãy mô tả các công trình, chất nền, quy trình in và các nhóm đơn vị phơi nhiễm. bao gồm thảo luận về sao chép thích hợp và phân bổ mẫu vật cho các phép đo phá hủy.Một bộ sàng lọc không tự động là kế hoạch chấp nhận lô được chứng minh thống kê. mô tả lý do và rủi ro liên quan đến quyết định.
Khi nào thì các tài liệu nhãn mác cần được tái chuẩn hóa?
Xem xét các thay đổi đối với việc xây dựng, quy trình in, chất nền hoặc ứng dụng. lặp lại các so sánh bị ảnh hưởng khi dữ liệu trước đó không bao gồm cấu hình được đề xuất. xác định chủ sở hữu đánh giá và giữ bản sửa đổi xây dựng bị ảnh hưởng, thay đổi đầu vào và bố trí liên kết với bằng chứng hỗ tr.
Xem xét các thay đổi đối với việc xây dựng, quy trình in, chất nền hoặc ứng dụng. lặp lại các so sánh bị ảnh hưởng khi dữ liệu trước đó không bao gồm cấu hình được đề xuất. xác định chủ sở hữu đánh giá và giữ bản sửa đổi xây dựng bị ảnh hưởng, thay đổi đầu vào và bố trí liên kết với bằng chứng hỗ tr.
Khi gửi thông tin ứng dụng cho Guanma, bao gồm chất nền và kết thúc, hệ thống in được đề xuất, trình tự phơi sáng và bằng chứng chấp nhận được yêu cầu. sử dụng các phạm vi vật liệu màng tự dính để xác định các công trình có thể có cho ứng dụng được chỉ định của bạn.
Ứng dụng liên quan: các giải pháp nhãn ngoài trời bền page cung cấp lộ trình ứng dụng sản phẩm cho các dự án nhận dạng môi trường. xử lý các vật liệu được đề xuất như là ứng cử viên cho các thử nghiệm và quá trình chấp nhận được xác định ở đây.
Tài liệu tham khảo & Nguồn
- Phương pháp thử nghiệm FINAT: phương pháp công khai và tuyên bố từ chối trách nhiệm về đặc tính hiệu suất.
- Nhãn & Web hẹp, Khoa học đằng sau nhãn kỹ thuật tồn tại lâu dài: Dave Joseph, Armis, tháng 8 năm 2026; đóng góp của chuyên gia liên kết với nhà cung cấp.
- IoPP, Kế hoạch đủ điều kiện nhãn gói: mẫu giáo dục không ghi ngày tháng; chỉ có nguyên tắc quy hoạch chung.
- NIST, Mỗi lần một biến: hạn chế so sánh yếu tố biệt lập.
- ASTM D5264-98(2019): phạm vi phương pháp mài mòn công cộng.
- ASTM D3330/D3330M-04(2025): phạm vi và giới hạn của phương pháp bóc vỏ công khai.
- ASTM G151-26: hướng dẫn giải thích phơi nhiễm nhanh công khai.
- ISO 2859-1:2026: mô tả lấy mẫu chấp nhận công khai.
- GS1, mã vạch 2D trong bán l: bối cảnh áp dụng và xác minh chất lượng mã vạch.
- ISO/IEC 15415:2024: danh mục tiêu chuẩn chất lượng in chính thức.